Creating an automated serverless website using AWS, GitHub and Terraform
I wanted to create a personal website where I could display information about myself and post technical writing surrounding technologies or ideas I am interested in. For me the site had to be serverless, easy to manage posts and have fully automated deployments. The advantage of this is the less time I have to spend building the website or managing servers the more time I can spend on developing my engineering skills and working on other proejcts. This first led me to Hugo. A lightweight static site generator written in Go that allows me to control the site through markdown and a configuration.toml file! On build Hugo will publish an artefact to public/ in the site root directory. This is the contents for the static site and where index.html will be placed.
So now I have a framework. I’ve met some of my requirements outlined in my introduction. I still needed a serverless platform to deploy to. Amazon S3 meets the requirement in this scenario, whilst S3 is traditionally used for object level cloud storage, it also has a static website hosting feature. We can store our artefact produced by Hugo in a bucket and have S3 serve the contents. This works because the contents of this bucket is static web content. Anything that utilizes server-side processing such as PHP or Python would not be compatible with this feature.
For deployments I can use the same platform where I am storing the source code for this website, GitHub. The actions feature can create automations that will run our Hugo build and then push our artefact to S3.
During the deployment I want to deploy or change our infrastructure as well as deploy our artefact. For this I opted for Terraform, a widely popular infrastructure as code tool to manage my resources in AWS via code. This give us the advantage of having the configuration of our entire infrastructure stored in a version control system. Then from this we can execute automations to deploy our configurations programmatically. Also giving us the advantage of rebuilding the entire configuration at any point, iterate on changes faster and take advantage of Terraforms idempotency.
Installing and configuring Hugo
I needed to install Hugo and its dependency Go.
After installing Hugo and configuring my theme by adding several configurations to my config.toml in the root of the site. I am able to write posts in markdown, this is made even easier by running hugo new posts/post.md. Then test the configurations with hugo serve and run the site locally on the default hugo port so when I navigate to 127.0.0.1:1313 I am presented with my site and first post.
First result
As you can see from the minimal setup I have the ability to post content to my site with a nice theme.

Building out the infrastructure
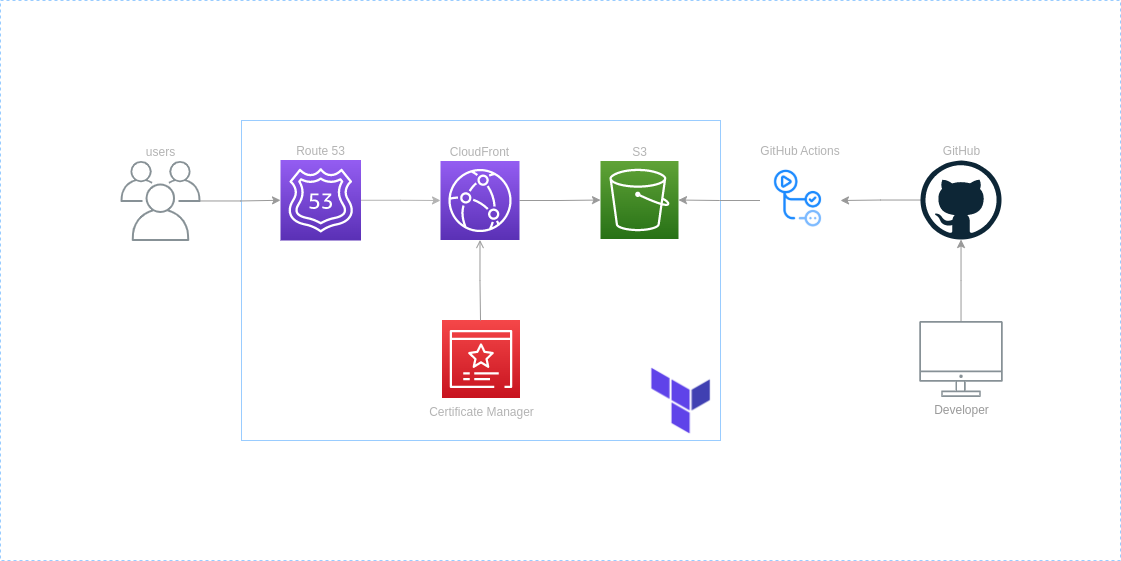
As defined in the architechure diagram above, everything in the blue box we are going to be deploying using Terraform.
- S3 bucket
- Cloud Front distrobution
- Route53 DNS records
- ACM certificate
Getting Started with Terraform
The first task here is to install Terraform. When we have installed Terraform and verified with terraform -version we can continue. To start we will structure the files based on services and resources that are utilized in that file.
.
├── certificate_manager.tf
├── cloud_front.tf
├── env.tfvars
├── main.tf
├── route_53.tf
├── s3.tf
└── variables.tf
You can see here that there are some files that are not represented by AWS services.
- main.tf - Where we will store our state file and provider configurations.
- variables.tf - Where we will declare all of our terraform variables with their type constraints and defaults.
- env.tfvars - Setting the values that correspond to our variables declared in variables.tf
In our main.tf we will need to configure our backend where our state file will be stored. The state file is used as a source of truth between your resources that are deployed and resources declared as a part of your configuration. When we create a resource as a part of our code, terraform will store the configuration for that resource in the state file. In this instance we have already created an S3 bucket in AWS that will host the state file.
terraform {
   backend "s3" {
       bucket = "logancox-blog-terraform"
       region = "eu-west-1"
       key    = "state/main"
   }
}
To declare variables in terraform we will use a variables.tf file a good example will be the bucket name where we will host our build. We set the type to string and add a description, I will not add a default here as I know we are passing in a tfvars file and S3 buckets must be globally unique (we will add a prefix when we create the bucket).
variable "blog_bucket_name" {
   description = "Our main blog bucket where contents are served from"
   type        = string
}
Finally we set the value of the variable in the tfvars file
blog_bucket_name = "logan-cox-blog-artefacts"
Building the S3 Bucket
The place we are going to store our website’s contents is an S3 bucket. So first we will need to create a bucket with a random prefix to ensure it is globally unique. We will define the name and tags we wish to apply to the bucket. The static website feature must also be enabled with an index_document and error_document. Finally attaching a bucket policy that makes our bucket publicly accessible.
resource "random_string" "random" {
   length           = 4
   special          = false
   lower            = true
   upper            = false
   number           = false
}

resource "aws_s3_bucket" "blog" {
   bucket = "${random_string.random.result}-${var.blog_bucket_name}"
   tags   = var.global_tags
}

data "aws_iam_policy_document" "blog" {
   statement {
       actions   = ["s3:GetObject"]
       resources = ["${aws_s3_bucket.blog.arn}/*"]

       principals {
       type        = "*"
       identifiers = ["*"]
       }
   }
   }

resource "aws_s3_bucket_policy" "blog" {
   bucket = aws_s3_bucket.blog.id
   policy = data.aws_iam_policy_document.blog.json
}

resource "aws_s3_bucket_website_configuration" "blog" {
   bucket = aws_s3_bucket.blog.bucket

   index_document {
       suffix = "index.html"
   }

   error_document {
       key = "404.html"
   }

}
Working with Certificate Manager
Before we create our CloudFront distribution we need to ensure we can serve our website over HTTPS. For this we will need a custom SSL certificate. This can be requested using the Certificate Manager service, this allows us to provision and manage SSL/TLS certificates to use with AWS services. The caveat with using ACM and CloudFront is that our certificate must belong in the US-EAST-1 region. So how do we provision resources in multiple regions? We add a provider alias to our configuration as shown below and reference that provider in the resource we are creating.
provider "aws" {
   alias = "acm_provider"
   region = "us-east-1"
}
resource "aws_acm_certificate" "blog" {
   provider          = aws.acm_provider
   domain_name       = var.domain
   validation_method = "DNS"

   tags = var.global_tags

   lifecycle {
       create_before_destroy = true
   }
}
As you can see in the configuration we have specified the provider argument that allows provisioning of the certificate in the region we set up an alias for. Then we specify the domain name we want to create the SSL/TLS certificate for and our validation method to prove that we do indeed own this domain. This is done via DNS validation, where we will add CNAME records AWS provide to our DNS configuration in Route53 to establish we own the domain we are requesting the certificate for. As long as these records exist AWS ACM is also able to auto renew our certificates. We have added the create before destroy lifecycle rule so terraform will create a new certificate before it destroys the old on ensuring it is always available as it will have a unique certificate ID, multiple can exist at once for the same domain.
Here you can see we are creating the necessary DNS records to validate we own this domain and our validator resource.
resource "aws_route53_record" "dns_validation" {
   for_each = {
       for item in aws_acm_certificate.blog.domain_validation_options : item.domain_name => {
       name   = item.resource_record_name
       record = item.resource_record_value
       type   = item.resource_record_type
       }
   }

   allow_overwrite = true
   name            = each.value.name
   records         = [each.value.record]
   ttl             = 60
   type            = each.value.type
   zone_id         = var.dns_zone_id
}

resource "aws_acm_certificate_validation" "blog" {
   provider                = aws.acm_provider
   certificate_arn         = aws_acm_certificate.blog.arn
   validation_record_fqdns = [for record in aws_route53_record.dns_validation : record.fqdn]
}
Building out the CloudFront Distribution
Cloudfront is the content delivery network in AWS. This is a set of globally distributed servers that allow us to cache content. This is where we are going to cache our website’s content that is stored in S3. This should give us lower latency than if we were to access the contents directly from S3 using the static website hosting feature, as it will be cached in an AWS edge location and this is what the user will access.
resource "aws_cloudfront_distribution" "blog" {
   origin {
       domain_name = aws_s3_bucket.blog.website_endpoint
       origin_id   = "S3-${var.blog_bucket_name}"

       custom_origin_config {
           http_port              = 80
           # Required but not used
           https_port             = 443
           # The origin endpoint HTTP only hence why we are using cloud front to serve traffic over SSL/TLS
           origin_protocol_policy = "http-only"
           # Required but not used
           origin_ssl_protocols   = ["TLSv1"]
       }
   }

   enabled             = true
   is_ipv6_enabled     = true
   default_root_object = "index.html"

   aliases = ["www.logan-cox.com", "logan-cox.com"]

   default_cache_behavior {
       allowed_methods  = ["GET", "HEAD"]
       cached_methods   = ["GET", "HEAD"]
       target_origin_id = "S3-${var.blog_bucket_name}"

       forwarded_values {
           query_string = false

           cookies {
               forward = "none"
           }
       }
       viewer_protocol_policy = "redirect-to-https"
       min_ttl                = 0
       default_ttl            = 3600
       max_ttl                = 86400

   }

   price_class = "PriceClass_200"

   restrictions {
       geo_restriction {
       restriction_type = "whitelist"
       locations        = ["US", "CA", "GB", "DE", "FR"]
       }
   }

   tags = var.global_tags

   viewer_certificate {
       cloudfront_default_certificate = false
       acm_certificate_arn            = aws_acm_certificate.blog.arn
       minimum_protocol_version       = "TLSv1"
       ssl_support_method             = "sni-only"
   }
}
Setting up Route 53
We need a way in which we can point our domain apex to the address of our cloudfront distribution. For this we will use an alias DNS record to forward all of our traffic to our cloudfront endpoint. This means that users will be connecting to cloudfront over HTTPS where the content is cached and not the bucket endpoint (HTTP). If the content does not exist in the cache cloudfront will request it from its origin(S3).
resource "aws_route53_record" "blog" {
   zone_id = var.dns_zone_id
   name    = var.domain
   type    = "A"

   alias {
       name                   = aws_cloudfront_distribution.blog.domain_name
       zone_id                = aws_cloudfront_distribution.blog.hosted_zone_id
       evaluate_target_health = true
   }
}
Constructing the build and deployment pipeline
In Github we can use the actions section to build an automated pipeline that will.
- Configure our build node with the necessary tools
- Run our terraform actions. Init, lint, plan and apply.
- Run Hugo build to produce our deployable artefact
- Remove stale content from S3
- Copy the artefact to S3
We have a single job that is run, split into multiple steps for each of our actions. We can define our base variables and then run bash commands in each step to build and deploy our site. We have configured this to run on every push and pull request to the main branch.
name: website-build

on:
  push:
    branches: [ main ]
  pull_request:
    branches: [ main ]

  # Allows us to trigger at any time
  workflow_dispatch:

env:
    AWS_ACCESS_KEY_ID:  ${{ secrets.AWS_ACCESS_KEY_ID }}
    AWS_SECRET_ACCESS_KEY:  ${{ secrets.AWS_SECRET_ACCESS_KEY }}
    INFRASTRUCTURE_DIRECTORY: infrastructure
    SITE_DIRECTORY: site
    S3_BUCKET: cnbr-logan-cox-blog-artefacts

jobs:
  build:
    runs-on: ubuntu-latest
    steps:
      - uses: actions/checkout@v2
        with:
          submodules: true
          fetch-depth: 0

      - name: Setup Go environment
        uses: actions/setup-go@v3.0.0

      - name: HashiCorp - Setup Terraform
        uses: hashicorp/setup-terraform@v1.2.1

      - name: Setup Hugo
        run: |
          sudo snap install hugo --channel=extended

      - name: Configure AWS Credentials
        uses: aws-actions/configure-aws-credentials@v1
        with:
          aws-region: eu-west-1

      - name: Terraform init
        run : |
          cd $INFRASTRUCTURE_DIRECTORY
          make init

      - name: Terraform validate
        run : |
          cd $INFRASTRUCTURE_DIRECTORY
          make validate

      - name: Terraform lint
        run : |
          cd $INFRASTRUCTURE_DIRECTORY
          make lint

      - name: Terraform plan and apply
        run : |
          cd $INFRASTRUCTURE_DIRECTORY
          make plan
          make apply

      - name: hugo build
        run : |
          cd $SITE_DIRECTORY
          make build

      - name: push build artifact to S3
        run: |
          cd $SITE_DIRECTORY
          make prune
          make deploy
Other solutions S3, CloudFront, OAI and Lambda@Edge
I had attempted to use the S3 HTTP endpoint to request the resources from the bucket meaning it was not publicly exposed, however this required a lambda@edge function to route requests as your default index does not apply to sub directories. This gretley impacted my performance when accessing the website and response times could hit 2 seconds. As there are performance limitations with lambda@edge I decided to go with the S3 static with CloudFront.
Future Improvment
In a later post I will explore some more topics arround my site such as monitoring and alerting, expanding the cloudfront and S3 deployment to multiple regions, adding a staging environment and a canary deployment pattern to the “production” environment.